Wednesday, October 31, 2012

Skeleton Corsets in Modern Corsetry

Happy Halloween!
Thought that the Skeleton Corset would be a good blog topic for today.
A Skeleton Corset is a corset made without fabric panels between the bones. they showed up in the late 1860's and go in and out of fashion for summer wear throughout the Victorian time period.


There are a few well known examples, first the Victoria & Albert Museum's 1890-1900 example is the most widely known having been published in books T.184-1962

This style has several horizontal bands holding the vertical bones together.


Next is the Metropolitan Museum's 1871 Example  2009.300.3104a–c which the acquired from the Brooklyn Museum.

This style has a wide waistband but no other horizontal bands other than the top and bottom binding.
I also have two Skeleton Corsets from the Brooklyn Museum.

There have been a Few Brave Souls who have recreated Skeleton Corsets, like my friend Twila, who based hers off the Met and my examples. She won an award for the whole outfit too, well worth reading her Dress Diary on it.

Then there have been some on the Live Journal Community Corset Makers. this link will take you the the Tag for Skeleton and Mesh Corset Some posts may be locked, in which case you will need to have a Live Journal account (it's free) and join the community.

Now that We have a bit of the History on it, let's take a look at just some of the modern examples.

If you do a web search the two examples you are likely to run into first are the Jean Paul Gaultier skeleton corset for Dita Von Teese and Louise Black's underbust corset with Skeleton Cameo on the front. Those two images are so prolific, I am not even going to share them!

Alexander McQueen


Paris Fashion Week Spring 2013
Source: style.com via Corsetra on Pinterest


Both these examples are qworn OVER other garments, likely structured as corsets.


Spring 2012


This looks like it is either the mass produced example or more likely a Knock off with the zipper in front


2012

Source: google.com via Corsetra on Pinterest


Jean Paul Gaultier
Spring 2013

Fall 2012
Source: vogue.fr via Corsetra on Pinterest
Source: vogue.com via Corsetra on Pinterest


Other Designers 

Skeleton corset-Paul Seville

Cage skeleton corset with nude net lining by ateliersylphecorsets
Source: google.com via Corsetra on Pinterest

Skeleton Corset by Lovesick


fleet ilya

La Perla Cage Bustier

I will continue to collect images of Modern Skeleton Corsets, so feel free to share with me, or if you need to correct my attributions, please do. I do not keep up with Modern Fashion well.

Monday, October 29, 2012

Etsy Monday October 29 Beaded Fairy

Today's NEW listing is for a beaded Fairy I made some years ago.
When I had children I had to put away a lot of my pretty objects to keep them and my children safe.
It is such a shame to have this fairy languish away in a box somewhere that I thought she might be better in a house that could display her.

Only 3" tall made of beads and wire, pose-able and pretty. No face on the head, but there is a definable front and back due to the arms and wings.

There is no loop for hanging, this is a figure.

Now up on my Etsy Shop Here

Thursday, October 25, 2012

Women's Land Army Breeches FREE PATTERN!

Porting over an old popular post from my other place on the web. So if you see this on another site, it's still me.
Originally post back in 2007
This was before I was making my patterns in CAD. This was not my first time taking a pattern off an old garment, I had done a Victorian bustle dress in a Friends collection earlier. This was however the first time I shared a pattern online. I have fond memories of taking the pattern off while my eldest child was in the highchair.

Or my Tribute to the late great Janet Arnold.

Women's Land Arm Corduroy Breeches
My mother bought these for me at a used Clothing store in Washington State, USA. I like odd clothing.
The Women's Land Army was a British war time task force mobilizing women to take over jobs that men used to do, mainly farm work, from what I can tell.


There is a LOT of pictures and text in this post, which is why most of it is hidden, so click for more.


Tuesday, October 23, 2012

What can you learn from the Selvage?

I use a lot of quilting cottons. It is cute and all over the place in fabric stores.
All my dragons use quilting cottons, most of my dolls as well.
My two Victorian dresses are cotton prints.

How often do you look at the selvage of those cotton prints?

Did you know you can learn things from the selvage?
Here are some of my most recent purchases.

Top to bottom: Top is what I am using for my Steampunk costume.
Next is slated to be bags
Then we have a Disney print I will use for something for my children.
The Paper doll fabric is also slated for child use.
Last is another print for my children.

Now let's take a closer look at what is printed on the selvage.
1. David Textiles inc. C. Victoria and Albert Museum, London. Sold for Noncommercial Home Use Only. Other Uses Prohibited. Do Not Use For Children's Sleepwear. then 4 color dots.
2. Hancock Fabrics and color dots
3. Buzz And Woody Stars. Disney .....Sold for Noncommercial Home Use Only. Other Uses Prohibited. Do Not Use For Children's Sleepwear. Color dots
4. Windham W Fabrics Presents Doll Christmas Pattern No. 30859 C.
5. "Back to School" Designs by Logantex C.


So out of these fabrics there are two designs that one is not supposed to make items to sell from. Which can be a bit of a bummer to the crafter, but better to be on the safe side.
The Hancock print is the only one that doesn't have a copyright symbol on it at all! that one is free to use for profitable sewing.
The last two do have the copyright symbol on them but do not cary any wording about commercial usage.
If a crafter makes something to sell at a craft bazar, art show, or etsy like sites, that is commercial usage.

What else does the selvage tell us?
Design name and number.
the last 3 fabric have a design name or number. Back to School, only has a name. and could be the name for an entire collection!
Having the name and number on the selvage is usefull for the customer should they need to obtain more of the fabric. for example, the Doll print came in multiple colorways, in this case different background colors. The print name could (and likely is) the same for all of them, but the number is unique to each of the prints.

The top fabric does not have a name or a number. All it lists is the V&A. which I was very happy to find. I picked the fabric out without looking at the selvage,when I saw that I wondered if it was a reproduction print.
After LOTS of searching on the interenet I came to find this is a William Moris print! Great for a Steampunk outfit. It is nice to learn that my eye for Victorianish fabric is getting better.

Last is those color dots. These are VERY helpfull for when you want to match colors in given prints. The green in the V&A print was VERY hard to match up, so I pulled out the green instead.
From Quilt Bug.com
"Look at the selvage of fabric you have just purchased. See those color dots? They aren’t there to help you choose co-ordinating fabrics, although many people use them that way. They are there for the manufacturer to make sure the color was correct and that it printed in the correct place.

Monday, October 22, 2012

Etsy Monday October 22 2012

Good Monday!
Today as I looked out my window, I saw the usual grey October sky and it reminded me of this silver skirt that I made some time ago. Before children, so it no longer fits.

The fabric was purchsed on a special shopping trip and you won't see anything like it at JoAnns or Hancock, it is NOT Lame' has a good amount of body and shine.

The clear plastic buttons with metal-like rings around them accentuate the back pleats.

Until November 5th this skirt is on sale for Half off! Now only $10 which is less than the fabric used it make it cost me!

The Back closure of this skirt is not traditional in that the 2 back pleats are open at the top and button at the waist. this allows ample getting in and out of room when you undo both of them.
The front of the skirt is a straightforward A line skirt


Measurements of the Skirt
Waistband 28"
3 inch Hip 32"+
8 inch Hip 36"+
(The pleats allow for a bit more room, than given measurements, but this is where they are designed to fall.)
Length 36"
Hem Circumference 149"


Thursday, October 18, 2012

Musings on Pattern Testing

I recently Read the FIRST edition of Publish Your Patterns by Nancy Restuccia
I found it to be a very well written book and I learn things that I hadn't even thought of. I know I will be rereading it again.
I wish I had know there was a second edition as this 10 year old book could really use some updating. Shame on me for not reading the Amazon listings better!
The book is geared more towards quilt and craft patterns, but garment pattern makers will gain some insights from it as well.

But this post isn't a review of a book, if you want reviews, go to Amazon.

I want to talk about pattern testing.
I have participated in pattern testing for other doll patern makers, and have tried to get some of my earlier patterns tested, so I have already stuck my toes in the water.

Pattern Testing
What is it, and why would you want to?
Pattern testing is when a pattern maker send their patterns out to testers who then make up the pattern. They test the pattern’s accuracy, it’s sizing, the instructions and over all appeal. This is done before the final publishing to get all the “bugs” out.

Why should patterns be tested?
Simple answer, to make sure there isn’t anything wrong with it.
The longer reason is that if a pattern maker doesn’t test a pattern and discovers after it is on the market (often from customers) that there is an issue, the pattern maker then has several bad patterns on their hands and in the hands of customers. It is simply wasted money. Mistakes will happen, pattern pieces may get left out, grading may be done incorrectly leading to seams not lining up, Instructions may be full of grammatical errors. Bad news spreads faster than good news. And a bad pattern can be damaging for a pattern maker’s business.

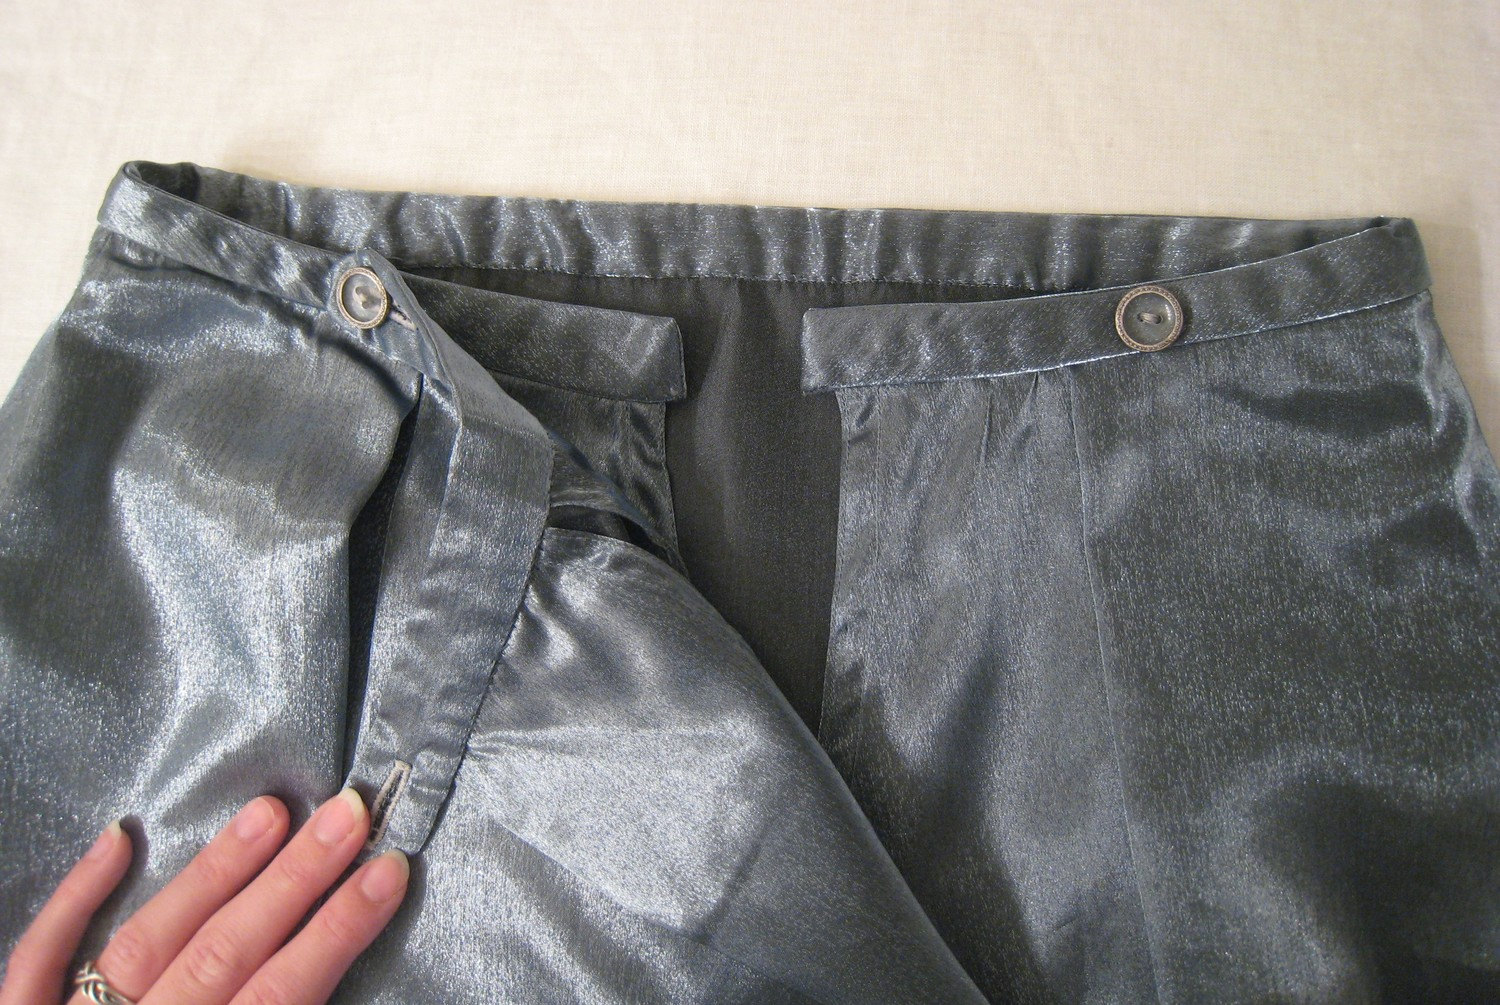
Can you spot the issue with this pattern? A screen shot of one of mine.


What is a pattern maker looking for in a tester?
A pattern maker will want a variety of people to test their patterns, from beginners to advance sewist, from those who are familiar with the type of pattern to those who are not. In the case of clothing, testers in a wide range of sizes and body type.

What is the role of a pattern tester?
The role of the pattern tester is to provide GOOD, CLEAR, USABLE feedback. A single sentence “the pattern was ___.” Is not what the pattern maker is looking for, nor is the pattern maker looking for the tester to rewrite the pattern.
Pattern testers should finish testing the pattern within the agreed upon timeframe. If an extension is needed, they should inform the pattern maker and request one. If the pattern tester is not able to complete, they should notify the pattern maker as a courtesy.

What should the pattern tester be looking for when testing the pattern?
It would be a good idea to have a notepad handy while testing a pattern. Suggested points to write down include, but are not limited to, the following:
  • Where the directions were confusing, even if a second reading cleared up the issue.
  • Was the yardage listed too little, too much, just enough?
  • Where the supplies easy to source, offer up alternatives if appropriate.
  • ANY deviations the pattern tester made from the pattern or instructions. Used a fabric that wasn’t recommended, cut a piece on the bias, used a stripe instead of a solid.
  • Any alterations on a clothing pattern to fit
  • Spelling or grammatical errors
  • Seams that don’t line up
  • Pattern cover appeal: photo, layout, text, price point.
  • Was the list of supplies complete, or did the instructions call for something not listed? Was something listed not used?
  • Was the pattern actually at the recommended level? Did it feel more advanced or more beginning level than it was stated as.
  • Were all the pattern pieces there, did they have all their appropriate markings? Did the seams line up like they were supposed to?
  • Was the garment pattern to size listed? If alterations were made to fit the pattern, what were they and were they common fitting methods to this individual (full bust, etc.)?
  • How long did it take to make? Were there reasons why it took that length of time (embellishments, hand sewn, etc.)

What NOT to do when testing a pattern.
Reply to the pattern maker with a list of spelling and grammatical changes ONLY, having never made the pattern up.
Share the pattern. It is after all a TEST pattern and the final produced pattern may have several changes made to it.
Ignore the instructions all together and just make it up any way they want. The instructions are also part of the pattern to be tested.
Take the pattern and never give any feed back or acknowledgement to the pattern maker. The pattern was sent out to be tested, not taken.

What a pattern tester may expect upon sending their review to the pattern maker.
Thanks.
Possibly more questions, to clarify any issues
Opportunity to test more patterns.
Invitation to share photos of the tested pattern.
Perks.

The responsibility of the pattern maker after the pattern has been tested.
Follow up with testers should they fall behind the review deadline.
Fix the mistakes.
Be polite to impolite testers.
Explain why the pattern was written the way it was if a different construction method was suggested by a tester.
Thank and reward testers appropriately.
Maintain good, clear, and polite communication.
Test the pattern a second time if needed.

This is just the beginnings of my thoughts on pattern testing ad at this point I am not ready to send any patterns out, but stay tuned.
I currently have a small list of people who will be asked first to test patterns, next group will be those who follow me on Facebook, and the last will be a public call here on this blog.

Monday, October 15, 2012

Etsy Monday October 15th three vintage Simplicity patterns

These three Simplicity patterns from 1955 are all a size 16, for a 34" bust.
These patterns were NEVER USED! so all the pieces are there and ready for you to use!
Get all three for $40 until Monday October 29th. Normally they are listed for $20 each. Since they are unused you do not have to worry about missing pieces. A good way to start building your 1950's wardrobe.

Body measurements: 34" bust, 28" waist, 37" hip.
Simplicity 1199 features both a straight and gored skirt on a shirt collar bodice that can have short sleeves or be sleeveless.
Simplicity 1159 has a full skirt on a raglan bodice
Simplicity 1445 features a dropped waist, with an absolutely stunning detail as the darts become tabs bellow the waist as well as offering up both a straight and full skirt.
Here is a closer look at those darts.

So for now until Monday October 29th, you can get all three patterns for $40. I have them listed for $20 each normally.


Friday, October 12, 2012

Sketchbook Friday Meet Girlfriend Dragon

Meet Girlfriend Dragon

So named by one of my young sons when I first drew her.
She is the logo for Corsetra Designs.
Why a Dragon in a Corset? Well she covers two of the largest aspects of our pattern offerings.
A Refresher image for you.

Corsetra Designs will be offering patterns in several different categories:
1. Corsets taken off of original Antiques and my own drafts.
2. Clothing of my own drafts, and taken off Antiques
3. Cloth Dolls and Dragons
4. Other Miscellaneous Crafts. (am don't feel like limiting myself)

Thus being a Dragon in a Corset she melds most of these aspects together and symbolizes what I want to produce as patterns.

Why not just stick to one of those aspects?
Honestly how many people limit them self to just ONE craft? So many crafts work well with other ones, and indeed, sometimes require other skills, that most, if not all of us actually do more than one craft all the time.
I like making dolls, and clothing for dolls. Many times I make an outfit I would LOVE to wear but can’t for any number of reasons in doll scale just so that I can make it.

Back to Girlfriend Dragon
Here is what the original hand drawing looked like when I scanned it in. Whoops, I ran out of page for all of her!

I also drew this image at the same times, but quickly decided that it wasn't a good representation of what I wanted to do for my pattern line.

I have actually made a dragon similar to the image some years ago, though I STILL have not made her a corset!

Meet Countessa Dragonessa Drackona of Dragonia
She is 19" tall and was made for a challenge on a yahoo group back in 2005. The challenge was to ONLY use the color purple, no other color, not even black or white.

The line from Disney's classic Sword in the Stone "Did I say no purple dragons" kept following me around. one night soon after the challenge was announced I was drawing and a lady dragon popped out of the page. So after some fabric shopping, I drafted up a pattern. and then let it sit. I procrastinated so long that I actually sewed her up in only 3 days, not bad. She placed second in the Public voting, and 6th over all (there were several layers of judging.)

She should get a corset at some time in the future, I think I even made a pattern for an edwardian one for her. It is porbably in the file with her original pattern. She also deserves to have her mate Count Drako Drackona of Dragonia made up for her, he is to be green.
Her eyes are made out of glass pebbles, which were painted on the back. Which you can see adds a realistic look to her when photographed.

Today I am going to play around with Spoonflower and try to get my logo made up so that I can recover my Child size dressform


Wednesday, October 10, 2012

Halloween 2012 Part 3

 This is the Third and last post on Halloween Outfits for My children. See the first post here

And the second post here

This was mainly done just for fun. As it is not a wearable.
I made each of my children a stuffed toy in their animal with the same fleece as their outfits using Simplicity 2387

This is a pattern for a Cat and Puppy, so I needed to make a bear. To make a bear, I just altered the cat ears to be round and the tail to be round as well. I think the Cat ear pattern should be more pointed.  The paws are difficult little pieces due to their size and I don’t think they added much to the foot shape, swinging the front of the leg out, might have done the same thing.


If you choose to make this pattern here are some things I did differently that I think made it easier.
1. Embroider the face before you attach the head front to the head back.
2. Hand sew the paw bottoms on by hand
3. Turn the body right side out and insert it into the head, which is inside out, and then sew the neck.

Each animal got a ribbon around it’s neck and a special button. The Dog has a Red Train, the Bear an Airplane with many colors, the Cat a Green Frog. Each child picked out their buttons.


My Children all love their animals and often carry them around and tuck them in at night. More than any of their other animals since these are specially made by Mama.
Unfortunately the Airplane button on the Bear's ribbon lost it's propeller when the child owning it was banging it against a table. Thus a tantrum followed and once he calmed down a trip to the fabric store to get a new button happened. He now has a green car.

Monday, October 8, 2012

Etsy Monday for October 8th, Sharing the love of other shops.

Today’s post is not my standard Etsy Monday post.
Today I will be talking about OTHER Etsy shops than my own.
These are shops of friends and acquaintances, and folks I have dealt with personally. Listed Alphabetically.

Atelier Sylphe Corsets
http://www.etsy.com/shop/AtelierSylphecorsets
Based in France, this corsetiere offers Ready made corsets and accessories as well as patterns from Antique Corsets in her personal collection. I have already bloged about using one of her patterns (dressform in miniature)
Also check out her Facebook page.


Texas According to Christy
http://www.etsy.com/shop/Christymlee
Christy loves things that relate to her state of Texas, and if you like Big State Style you should check out her shop which features prints, decor, and clothing as well as some supply destash.
I particularly love the Flour Sack Purse!

CocoRocaille
http://www.etsy.com/shop/CocoRocaille
This is the shop of  Sarah Loraraine of Mode Historique.
http://www.modehistorique.com/blog/
Her Etsy shop is filled with  vintage items like jewelry and patterns, as well as supplies like fabric. She is raising money for her research trip as talked about on her other blog Scandalous Liberty.
http://chemise-a-la-reine.blogspot.com/


Hush, Little Baby
http://www.etsy.com/shop/HushOrganicBaby
Hush, Little Baby is run by a friend of mine from my college days and her husband. It was inspired by their little girl. Products they offer include natural skin care made from Organic and non-GMO ingredients and Kawaii clothing and accessories for children and adults. They are open to custom orders.
They also have a Facbook page wher you can occasionally learn about Special Offers.
http://www.facebook.com/HushOrganicBaby


Jolly Dicey Costume
http://www.etsy.com/shop/Jollydiceycostume
Jolly Dicey is a team effort of two very creative ladies in London, England and they make historical and fantastical costumes. They have some items ready made and listed in their shop and are open to custom orders. The level of historical accuracy in their costumes is varied upon their clients needs and desires. They are active in a certain LARP, and do other historical events throughout the year.


Mockingbird Workshop
http://www.etsy.com/shop/mockingbirdworkshop
Mockingbird workshop is the creative endeavors of a friend of a friend, who I now call a friend.  Like many artistic people, her creative work is diversified into more than one medium, so go check out her current listings.

Raven’s Trove
http://www.etsy.com/shop/ravenstrove
Trish makes lovely handmade veils and also has been destashing her pattern collection. She has several out of print costume patterns, particularly in the larger sizes.

Redcedarworks
http://www.etsy.com/shop/redcedarworks
This is the woodworking artisan who made my wooden doll in the 18th century style.
Take a look at the listing!
https://www.etsy.com/transaction/31463890
I still have to add the linen arms to the doll and paint her, but her shape is exactly what I wanted. He did an excellent job at executing the pattern that I had drafted up.
The pattern can be seen here and you can use it to make your own, or have someone else make one for you. Why not contact Redcedarworks too see if he will make one for you since he already has experience in it.

Silverstah
http://www.etsy.com/shop/silverstah
I met her on a wedding board and just followed her around the net. At one point I did order some fiber from her, and she was the inspiration for the little toddler Bias Plaid Cottes that I have made and will eventually be a pattern produced by Corsetra Designs.
On her Etsy page she is selling handmade ready to wear costumes suitable for SCA and Ren fair as well as Fantasy wear. She also has destash items listed. So look for fabric, trims, and patterns.

Blankie Doodle
And finally a non-Etsy crafter (because she hasn’t gotten to Etsy!) is my Sister who makes custom baby blankets. You can see her work on this webpage
http://www.blankiedoodle.com/
and her Facebook page as well.
(please note She is NOT blankiedoodle.blogspot)

So please go and visit my friends' shops and when you order, tell them you heard about them from Corsetra!

Friday, October 5, 2012

Halloween Part 2

This is the Second post on Halloween Outfits for My children. See the first post here

I had difficulty finding a coat pattern that I liked, I settled on Simplicity 2745
 
Because it was CUTE For my daughter, and came in all the sizes I would need for all my children. I would need to alter the pattern to make it boyish, but that wasn’t hard. Also the pants pattern could come in handy for my children’s first winter in a climate that snows.

To make it for my daughter I decided on using a contrasting color for the godets. I loved the way this looked, but if I was to do it again, I would alter the side seam so that it also had a godet in it, this would not be a hard thing to do.

A word of advice, the godet is 1 size for ALL sizes, it is not graded, and thus will end up starting well below the waist on the larger sizes.  I made the size 3 for my daughter, and the godet starts at the hip.

 To alter it to be boyish, I combined the side front with the front, and the side back with the back, by removing the princess lines and cutting the pattern off at the hip.  I also did not put the collar on.
The boys coats close with zippers. Which means I altered the front to no longer have that overlap the pattern included for the buttons.


The boys got to pick their own buttons.
 Last I sewed and stuffed tails and attached them with snaps to the back of the coat. The snaps add a bit of safety should a tail get pulled or caught.  The pin of the snap is pushed through the fleece from the inside so that they are more hidden. I used large size 2 snaps for the tails, three on the dog and bear, 2 on the cat tail. To the left is what the snaps look like from the outside of the coat, the right is the inside view.


My child's form is a size 3, so the Dog tail is actually attaching bellow the form's base and thus is drooping more than it does on my child.


My daughter got a Bow on her backside that hides the attachment of the tail. Little girls can rock the butt bow way better than us grown-ups!


As far as the coat pattern goes, besides the godet issue, I found the sleeves were rather long. I ended up turning them up 3” on all my children. I also highly recommend a wavy rotary cutter for finishing the edges as it is quicker than sewing and looks very nice, particularly on the collar!

The Third Post can be found Here.