
First idea was this project that I have been wanting to do for a while.
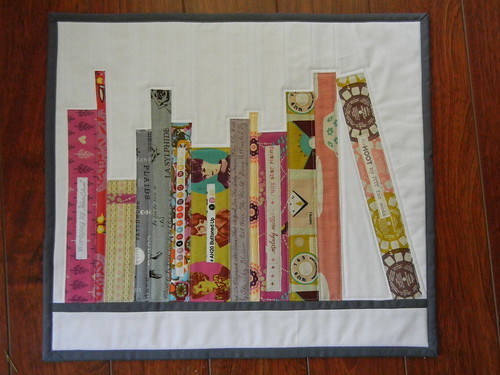
Mini Bookshelf Quilt Tutorial by Don't' Call Me Betsy
Second the idea of a needle-book
Last was the idea that the finished gifts should LOOK like books when finished.
I ended up making TWO gifts, and my husband also contributed his skills to the gift, so it is from both of us!
The first gift is a Bag.
The second is a sewing supply case/needlebook
I wanted the bag to fold up into itself and when zipped close resemble a book. That last part is why I had to sit down and write an equation, which I already bloged about.
Once I had all my math done, it was time to work on the book shelf design. I went through all my stash and cut off the useful selvages.
I want to warn you, if you ever intend to do a project using selvages, do not go to the fabric store with selvage on your mind. I needed a zipper, but found myself looking at fabric, JUST to see if it had a cute selvage name! I was good and didn't buy any fabric for the sole purpose of selvage.
I hand appliqued the entire design, using scraps and stash, in fact the only thing I bought for the bag, was the brown book cover and the zipper.

Appliqueing the books took the most time of the whole project, but I enjoy hand sewing and I wanted a nice finish, also those selvages are narrow...

The V&A one is my favorite, I decided that it HAD to be a big thick book.

I must admit I went and looked at my bookshelves to double check the direction the titles should go. I am please to have a few that were narrow enough to go horizontally!
Once the applique was done I moved on to the "book case"
This was what the math was all about, two layers of coton with a layer of batting inbetween, since it was going to be stitched to the bag, I cut one side to turn it right side out.
Then I applied the zipper 1/4" in from the edges.
Here is what it looked like before I attached it to the bag.


So that was the first gift, the second was also in a zippered book, slightly smaller, inside are sewing tools.


So that was my weekend craft project, unfortunately I was working on it until the party was to start, and transit time would have made it prohibitive to go for such a short visit, not to mention my children needing a regular dinner and bedtime.
how do you make the zipper go all the way around like that i want to make "book" like this but had trouble putting the zipper in and not looking bulky help please!
ReplyDeleteMeasure around where you want the zipper, then add in the width of the zipper itself, add in an additional small amount. You have to leave a bit of a tail at the closed end of the zipper so it will lay flat when opened.
Delete