Today I received and e-mail from Doll Artist Yve HooSon concerning a pattern I had made back in 2010.
Yve was concerned that my pattern was being shared illegally on the internet and contacted me, I had listed my e-mail in the pattern, to make sure that it was okay to share this pattern with others that were interested.
I can't tell you how happy it made me to see someone concerned about the legalities of a pattern floating around on the internet, and secondly, that people WERE sharing it!
It isn't much of a pattern, more of a template, since I do not know much about woodcarving, I couldn't write instructions, but I was able to get the shape I desired from a skilled woodcarver who had never done a period doll before.
You can check out the post about the 18th Century styled Wooden Doll Pattern here.

Musings of an upcoming pattern line and other projects.
Monday, February 3, 2014


A Wooden Doll in the 18th century style
Some years ago I wanted a wooden doll in the Queen Anne style and contacted a woodcarver through Etsy to create one for me. Then other projects got in the way and I haven't gotten back to her to finish her.

She is missing arms because the upper arms are to be made of cloth.
 I had to create a "pattern" for the doll and decided to share it with the world at large. But I have never shared it here!

So here is the PDF that I created with the "pattern" so you can make you very own wooden doll in the 18th century style, and have fun dressing her!
She is missing arms because the upper arms are to be made of cloth.
So here is the PDF that I created with the "pattern" so you can make you very own wooden doll in the 18th century style, and have fun dressing her!
Friday, January 31, 2014
Skeleton Corset: Jan/Feb Update
We have finally gotten some snow here in my area, unusual for us that it has come so late. The children are wanting to go out and play, but we have so little time between school and household chores that we haven't managed that yet.Hopefully they will get their chance this weekend, I have been instructed that I will be staying inside with my tea trying to get over this cold I have.
I have been making progress on the Skeleton Corset, though I have little to show for it yet, most of it has been in my head and written down, no sewing yet. I still haven't found the right fabric.
In my last post I mentioned that I was procuring photos from the Metropolitan Museum of Art, I am sorry to say that I am not getting photos. They didn't have any and new photos were not a possibility. To say that I was disappointed upon hearing that, is an understatement, the chocolate stash was decimated!
But the upside of this is that I am not spending several hundred dollars on photos and thus the pattern, when it comes out, will be more affordable.It also means that I am not waiting on photos for several weeks, pushing my work late.
I have also been going over sizing of the corset pattern.

You see, just increasing the size of the zone waist and bust/hip bands will not produce a good fitting corset, the spacing between the verticals gets too great.
So I have come up with several size ranges, each with a different number of verticals. The size ranges overlap a bit so that some wearers may chose between 2 size ranges (having an odd or even number of verticals.) To determine this I thought long and hard about how close/far apart the verticals should be and then worked out in even increments how the size ranges should be.
I am working on the smallest size range first (the one that *I* am on the larger end of!) and will work my way up to the larger sizes.
My goal is to have this be a very customizable pattern where you choose the pattern based on your measurements to get the best possible fit. This is going to take some time, but I promise it will be worth it!
I have been making progress on the Skeleton Corset, though I have little to show for it yet, most of it has been in my head and written down, no sewing yet. I still haven't found the right fabric.
In my last post I mentioned that I was procuring photos from the Metropolitan Museum of Art, I am sorry to say that I am not getting photos. They didn't have any and new photos were not a possibility. To say that I was disappointed upon hearing that, is an understatement, the chocolate stash was decimated!
But the upside of this is that I am not spending several hundred dollars on photos and thus the pattern, when it comes out, will be more affordable.It also means that I am not waiting on photos for several weeks, pushing my work late.
I have also been going over sizing of the corset pattern.
You see, just increasing the size of the zone waist and bust/hip bands will not produce a good fitting corset, the spacing between the verticals gets too great.
So I have come up with several size ranges, each with a different number of verticals. The size ranges overlap a bit so that some wearers may chose between 2 size ranges (having an odd or even number of verticals.) To determine this I thought long and hard about how close/far apart the verticals should be and then worked out in even increments how the size ranges should be.
I am working on the smallest size range first (the one that *I* am on the larger end of!) and will work my way up to the larger sizes.
My goal is to have this be a very customizable pattern where you choose the pattern based on your measurements to get the best possible fit. This is going to take some time, but I promise it will be worth it!
Thursday, January 16, 2014
Skeleton Corset Pattern: January Progress Report
Slowly I am making progress on the Skeleton Corset Pattern.
Unlike original designs, such as my craft patterns, Historical Costume Patterns have many more steps in them, most fall under the category of research.
For this project I have spent several hours reading modern books, Antique books, Patents, Museum Descriptions, etc...
Historical Patterns can also be more expensive than an original design, especially if based of an antique garment or original antique pattern. You may be lucky enough to have been gifted it, but if you are serious, chances are high that you would have purchased it.
You need to handle the garments carefully to take patterns off them, and old paper is easily damaged too. Storing those items safely is also an investment, but one worth doing.
Along your path of research you will likely run into a roadblock and call out to your fellow enthusiasts. Sometimes they will have something right at hand, other times they will remember something months later and inform you about it. Networking with others is valuable and I can honestly say without the help of a few key costumers I wouldn't be doing this now.
I purchased the first Skeleton Corset over 4 years ago. FOUR YEARS! Since then I have purchased the second, received help and research from others (I live on the wrong coast!) and waited with baited breath for the Metropolitan Museum of Art to get more photos up.

I believe this pattern will be my most expensive to produce. Not only have I purchased 2 antique corsets for a few hundred dollars each, I am also procuring photos from the Metropolitan Museum of Art for my research. I wouldn't be surprised if the final cost of items purchased to produce this pattern goes past $1,000! I STILL have to source a good fabric to make reproductions out of as my 2 Skeletons are not made of herringbone coutil, the commonly recommended fabric for professional corsets today.
So on top of the normal pattern making, grading, photography and instruction writing, there is a lot more work put into a historic pattern, which is likely WHY they are some of the more expensive patterns out there! I will try to keep my pattern prices low and competitive, so it may not be including all the possible variations.
Unlike original designs, such as my craft patterns, Historical Costume Patterns have many more steps in them, most fall under the category of research.
For this project I have spent several hours reading modern books, Antique books, Patents, Museum Descriptions, etc...
Historical Patterns can also be more expensive than an original design, especially if based of an antique garment or original antique pattern. You may be lucky enough to have been gifted it, but if you are serious, chances are high that you would have purchased it.
You need to handle the garments carefully to take patterns off them, and old paper is easily damaged too. Storing those items safely is also an investment, but one worth doing.
Along your path of research you will likely run into a roadblock and call out to your fellow enthusiasts. Sometimes they will have something right at hand, other times they will remember something months later and inform you about it. Networking with others is valuable and I can honestly say without the help of a few key costumers I wouldn't be doing this now.
I purchased the first Skeleton Corset over 4 years ago. FOUR YEARS! Since then I have purchased the second, received help and research from others (I live on the wrong coast!) and waited with baited breath for the Metropolitan Museum of Art to get more photos up.
I believe this pattern will be my most expensive to produce. Not only have I purchased 2 antique corsets for a few hundred dollars each, I am also procuring photos from the Metropolitan Museum of Art for my research. I wouldn't be surprised if the final cost of items purchased to produce this pattern goes past $1,000! I STILL have to source a good fabric to make reproductions out of as my 2 Skeletons are not made of herringbone coutil, the commonly recommended fabric for professional corsets today.
So on top of the normal pattern making, grading, photography and instruction writing, there is a lot more work put into a historic pattern, which is likely WHY they are some of the more expensive patterns out there! I will try to keep my pattern prices low and competitive, so it may not be including all the possible variations.
Friday, January 10, 2014
Custom Plush Pattern Making
Do you have an idea or even a drawing, and you want to turn it into plush?
Do you know how to sew, but can't seem to wrap your brain around how to make that 2D drawing into a pattern for a 3D plush?
I am gifted with a brain that translates 2D to 3D well, especially after years of studying dolls, plush and patterns.
I will create for you a PATTERN for you to create your creation in fabric
Pricing STARTS at $50 on Etsy, some additional charges may apply, read the full requirements HERE
Here is an OLD example from 2004. My young cousin filled a couple of pages with drawings of aliens. I took those pages home and created this Alien and his spaceship for my cousin. I wonder if he still has it?


The spaceship's vinyl top buttoned on in case it needed to go into the wash. It is supported by cable ties in the solid sections, helping it to keep it's shape. Two zippers on one section allow access to the cockpit.


The pilot's chair swivels on a doll joint and has elastic straps to hold the pilot in place.


Once again you can start the process of having your design become a hugable plush animal or doll by checking out this listing on Etsy
Do you know how to sew, but can't seem to wrap your brain around how to make that 2D drawing into a pattern for a 3D plush?
I am gifted with a brain that translates 2D to 3D well, especially after years of studying dolls, plush and patterns.
I will create for you a PATTERN for you to create your creation in fabric
Pricing STARTS at $50 on Etsy, some additional charges may apply, read the full requirements HERE
Here is an OLD example from 2004. My young cousin filled a couple of pages with drawings of aliens. I took those pages home and created this Alien and his spaceship for my cousin. I wonder if he still has it?

The spaceship's vinyl top buttoned on in case it needed to go into the wash. It is supported by cable ties in the solid sections, helping it to keep it's shape. Two zippers on one section allow access to the cockpit.
The pilot's chair swivels on a doll joint and has elastic straps to hold the pilot in place.
Once again you can start the process of having your design become a hugable plush animal or doll by checking out this listing on Etsy
Wednesday, January 8, 2014
Facing Challenges
Early last year I asked what pattern people would be interested in seeing released.
The Skeleton Corset pattern won, which didn't surprise me.

But what did I do next?
NOTHING!
Oh I thought a lot, read some, and blogged about various market research topics. I made very little progress on any of those patterns that were in the poll.
I went through a dark spot, then came summer, school was out and I find it very hard to do anything really work-like while the children are around and underfoot.
I eventually found a group of soft toy designers and interacting with them light a fire under me. I released 2 patterns last year, neither of them were planed more than a month before their release. I didn't see them coming.
But I put myself and my work out there, I have learned from those two craft patterns how to make a better pattern, how to format it, test it, market it, and more.
I was again reminded by someone in my "cheer squad" that the Skeleton Corset is wanted as a pattern, and so I again turned my focus on that. I took stock of what I had, what I needed to do, I made a list, I shared it for accountability. More time spent thinking in private followed.
I have been wanting to produce the Skeleton corset pattern for almost 4 years now, why did I keep avoiding it, it seemed so large of a project, I would work some, then get stuck, bored, distracted, and it would still be there.
Then one day, I was on Pinterest (you can follow Corsetra Designs here) and I saw a skeleton corset that I hadn't seen before.
Low and Behold, the Met has more of the Brooklyn Museum Costume Collection up online.
First I went through a state of happiness and excitability, yes I had more research, I love research.
Then as the hours past I started to have, what I can only describe as a mild panic attack. I decided to put the computer to sleep and went out for a walk to burn up energy.
That evening I realized why I had that reaction.
I had been HIDING from this project, hiding behind some little roadblocks, of which these photos were one.
Now that the children are back in school, I am buckling down at working on the pattern, slowly but steadily, i have so far come to a few conclusions:
The Skeleton Corset pattern won, which didn't surprise me.
But what did I do next?
NOTHING!
Oh I thought a lot, read some, and blogged about various market research topics. I made very little progress on any of those patterns that were in the poll.
I went through a dark spot, then came summer, school was out and I find it very hard to do anything really work-like while the children are around and underfoot.
I eventually found a group of soft toy designers and interacting with them light a fire under me. I released 2 patterns last year, neither of them were planed more than a month before their release. I didn't see them coming.
But I put myself and my work out there, I have learned from those two craft patterns how to make a better pattern, how to format it, test it, market it, and more.
I was again reminded by someone in my "cheer squad" that the Skeleton Corset is wanted as a pattern, and so I again turned my focus on that. I took stock of what I had, what I needed to do, I made a list, I shared it for accountability. More time spent thinking in private followed.
I have been wanting to produce the Skeleton corset pattern for almost 4 years now, why did I keep avoiding it, it seemed so large of a project, I would work some, then get stuck, bored, distracted, and it would still be there.
Then one day, I was on Pinterest (you can follow Corsetra Designs here) and I saw a skeleton corset that I hadn't seen before.
Low and Behold, the Met has more of the Brooklyn Museum Costume Collection up online.
First I went through a state of happiness and excitability, yes I had more research, I love research.
Then as the hours past I started to have, what I can only describe as a mild panic attack. I decided to put the computer to sleep and went out for a walk to burn up energy.
That evening I realized why I had that reaction.
I had been HIDING from this project, hiding behind some little roadblocks, of which these photos were one.
Now that the children are back in school, I am buckling down at working on the pattern, slowly but steadily, i have so far come to a few conclusions:
- There are several variations, I have narrowed them down into their similarities and differences, I hope to offer all of them, but am focusing on the most common version first. (which is NOT the 1869 in my collection)
- I am thinking of offering up the main pattern, then add-on variations, and also the whole collection in one big group. The releases may be at the same time or staggered.
- I will be making up a few for myself and those nearby to test the pattern before I have others test it.
- I WILL be testing this pattern, so keep an eye out for a testing call.
- I hope to get this in testing before June, since I now know from last year that summer is a slow time for me.
Monday, December 30, 2013
End of 2013 Post
As we wrap up the year, I thought it would be good to go over what has happened this year.
Top 5 posts of 2013
 The top blog post of 2013 was the End of February post where
I talked about the poll results and the direction I was hoping to be
headed. Funny that 10 months later I am in the SAME position, sick,
needing to organize my sewing space, and start on those projects!
The top blog post of 2013 was the End of February post where
I talked about the poll results and the direction I was hoping to be
headed. Funny that 10 months later I am in the SAME position, sick,
needing to organize my sewing space, and start on those projects!
Introducing the pattern poll was a very popular post, which isn't surprising as I posted a link to it on several forums.
I posted a who series on pattern formats, but this post on (paper) Pattern Covers was very popular. I took a look at other patter types in other posts
With slightly less views was this entry on Pattern Envelope Backs.
In fifth place for view numbers was the post where I announced which of the two corset patterns won the poll. The Skeleton Corset came in first place, in case you didn't know.
Now for the 5 least popular blog posts of 2013, Have you seen these? Why not?
The very least viewed post, when I created an image for sharing about the pattern poll.
Balancing Steps was the post right after the introduction of the poll. In this post I talked more about where I was at than any creating happening.
Food, not Sewing, yes I blogged about cooking once, I am not much of a cook, so there will not be many of these posts at all. This was also the first thing I made from something I pined on Pinterest. I eat Gluten Free and this is still a recipe that I use on a regular basis.
My most recent post has not had many views, likely due to the holidays and the fact that not many would be interested in making a pair of wings for a purchased stuffed pony. I am pleased to report that even though Making Twilight into an Alicorn is not a top post of the year, my Child is very happy with it an that is all that matters.
 Spiral Ornaments on my Tree had only a handful of views, Probably due to the holiday season. It was only my second pattern release.

Well Here is to New and Better things in 2014, I think I need to go tuck myself back into bed now.
Top 5 posts of 2013

Introducing the pattern poll was a very popular post, which isn't surprising as I posted a link to it on several forums.
I posted a who series on pattern formats, but this post on (paper) Pattern Covers was very popular. I took a look at other patter types in other posts
With slightly less views was this entry on Pattern Envelope Backs.
In fifth place for view numbers was the post where I announced which of the two corset patterns won the poll. The Skeleton Corset came in first place, in case you didn't know.
Now for the 5 least popular blog posts of 2013, Have you seen these? Why not?
The very least viewed post, when I created an image for sharing about the pattern poll.
Balancing Steps was the post right after the introduction of the poll. In this post I talked more about where I was at than any creating happening.
Food, not Sewing, yes I blogged about cooking once, I am not much of a cook, so there will not be many of these posts at all. This was also the first thing I made from something I pined on Pinterest. I eat Gluten Free and this is still a recipe that I use on a regular basis.
My most recent post has not had many views, likely due to the holidays and the fact that not many would be interested in making a pair of wings for a purchased stuffed pony. I am pleased to report that even though Making Twilight into an Alicorn is not a top post of the year, my Child is very happy with it an that is all that matters.

Well Here is to New and Better things in 2014, I think I need to go tuck myself back into bed now.
Thursday, December 26, 2013
Making Twilight into an Alicorn
For Christmas I got my children the 7” My Little Pony plush made by Ty.
I knew they would want Twilight Sparkle to be an Alicorn (winged unicorn), so I made “Princess” wings for Twilight Sparkle out of polar fleece.

I spent that last few days sewing these wings up, in plain sight of my children, telling them they were dragon wings (they almost believed me) and then attached them on Christmas Afternoon.
In case you too want to turn your Pony into a Pegasus, here is the pattern for the wings.

The pattern is for PERSONAL USE ONLY
Tuesday, December 24, 2013
Spunky Hedgie
As part of my market reserach, I purchased Dolls & Daydreams' Hedgehog pattern to make up for a friend of mine.
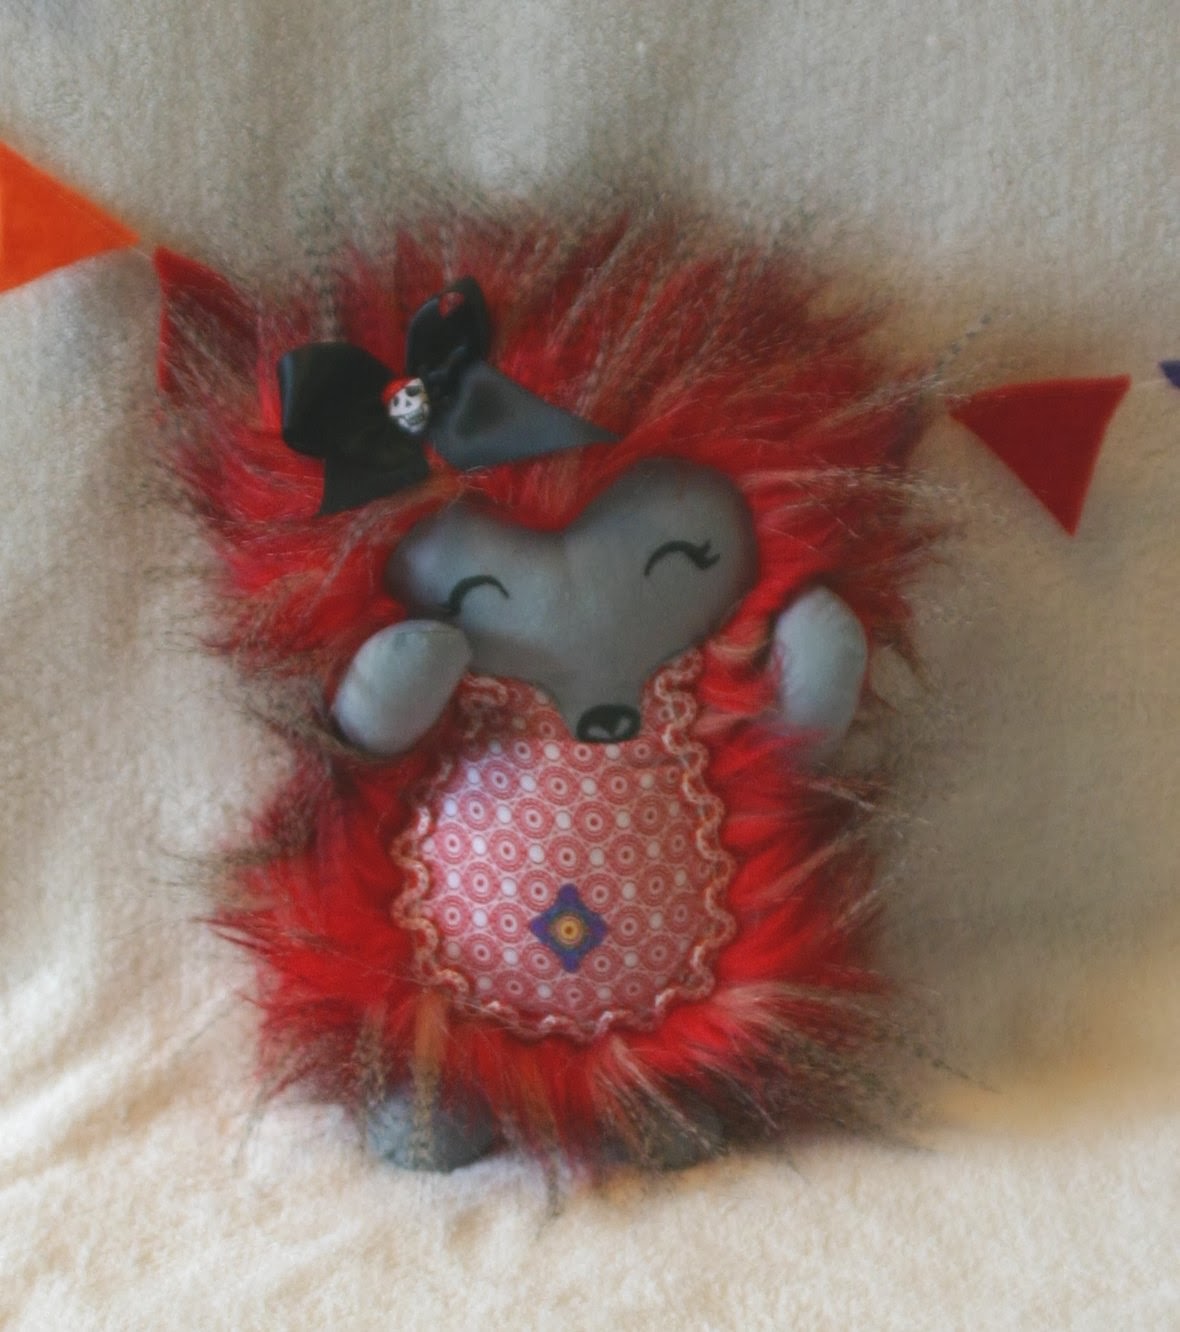
While I had brown curly fabric like that shown on the pattern cover, I decided to see what my fabric store had. I ended up getting this fake furn in my friend's colors: Red, Black, & White.
I cut my pattern out with the fur direction going UP, in the hopes that this would give a more spiky look when finished.
Now this fur is long, especially for the size of the pattern, I didn't want extra fur in some places, so I cut off the fur 1/2" inside where the tummy and face would be. To do this I printed out a second pattern piece, cut out the sections that would be covered, drew around that on the back of the fur, then stitched using long stitches on the fur side, short on the back, and carefully found my stitches in the fur and cut off a boarder inside that stitch line.
I don't like using iron on bonding products, preferring to sew, so for the tummy and head, I traced the shapes onto my fabric, stitched on the lines, cut out, made a slash on the back THROUGH ONE LAYER ONLY. Then turned RSO, pressed and stitched down.
I added trim around the belly and decorated her belly with some fabric markers. Her face is also done with fabric markers. The scull on the bow is not a charm or button but a motif from a quilting cotton, It was small and fiddly but I knew it was just the right touch.

This was a gift for my dear friend, But she was sitting around my place for several months. I will however miss seeing this happy face around my house, but I can always make up another, I still have plenty of the fur (and no other idea what to do with it!)
Dolls and Daydreams pattern was clear and simple to follow, being a "flat" doll shape. There were clear step by step instructions. I did change things up a bit, besides the fabric choices (she recommends having the fur going DOWN, which is what you normally do with fake fur, but isn't very hedgehog-like.) I do however prefer to use the template method for small pattern pieces like the arms and legs, which is what I did.
While I had brown curly fabric like that shown on the pattern cover, I decided to see what my fabric store had. I ended up getting this fake furn in my friend's colors: Red, Black, & White.
I cut my pattern out with the fur direction going UP, in the hopes that this would give a more spiky look when finished.
Now this fur is long, especially for the size of the pattern, I didn't want extra fur in some places, so I cut off the fur 1/2" inside where the tummy and face would be. To do this I printed out a second pattern piece, cut out the sections that would be covered, drew around that on the back of the fur, then stitched using long stitches on the fur side, short on the back, and carefully found my stitches in the fur and cut off a boarder inside that stitch line.
I don't like using iron on bonding products, preferring to sew, so for the tummy and head, I traced the shapes onto my fabric, stitched on the lines, cut out, made a slash on the back THROUGH ONE LAYER ONLY. Then turned RSO, pressed and stitched down.
I added trim around the belly and decorated her belly with some fabric markers. Her face is also done with fabric markers. The scull on the bow is not a charm or button but a motif from a quilting cotton, It was small and fiddly but I knew it was just the right touch.
This was a gift for my dear friend, But she was sitting around my place for several months. I will however miss seeing this happy face around my house, but I can always make up another, I still have plenty of the fur (and no other idea what to do with it!)
Dolls and Daydreams pattern was clear and simple to follow, being a "flat" doll shape. There were clear step by step instructions. I did change things up a bit, besides the fabric choices (she recommends having the fur going DOWN, which is what you normally do with fake fur, but isn't very hedgehog-like.) I do however prefer to use the template method for small pattern pieces like the arms and legs, which is what I did.
Monday, December 16, 2013
Spiral Ornaments on my Tree
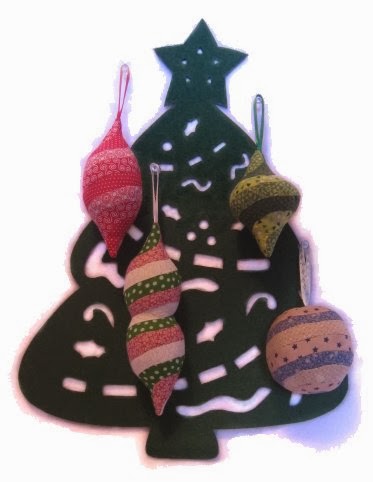
Last pattern for 2013 is this set of 4 spiral ornaments.
 This pattern was designed back in November. I participated in a stuffed ornament swap with other soft toy designers, while technically I think they were expecting an animal, this was the design that popped into my head.
I came up with at least 6 different shapes, some didn't work out too well, others were to similar. Each pattern has gone through at least 2 revisions, some more than that!
This is a pattern I couldn't have created quickly without the use of CAD, no it wasn't a 3D model build, but it would have taken FOREVER to do with paper and pen.

There are 4 different ornaments, each has enough variations to distinguish it from the others.
Ornament C was actually the first pattern I developed, it is the most difficult of the lot do to the pattern piece doubling back on itself. It is the longest at 6 1/2" (16.5) long
Ornament A, at 5 1/2" (14cm) long, was then created, I essentially chopped off the center section of the pattern, this is the easiest of the 4 patterns, as it doesn't have as steep of curves. This is why it is listed first, instead of Ornament C
Ornament B followed quickly on the heels of A, but was a totally new draft. I was drawing inspiration from traditional glass ornament shapes. 4" (10cm) long.
Ornament D was created while the pattern went through its first round of testing. I decided I needed a sphere shape to round out the set. You saw this 3" (8cm) sphere in my last post.
This pattern has step by step photos as well as a lot of tips on sewing curves. The general consensus of the pattern testers was that this was NOT a beginners pattern, so it is described as intermediate. There is quite a bit of hand sewing involved in this pattern, so knowledge of hand sewing techniques is required.
This pattern is a good use for scraps as the largest pattern can be made from just three pieces, each measuring 4"x16" (10cmx40.5cm)
I have been able to make one up in an afternoon. I love knowing that my children will not be able to turn these ornaments in to dangerous shards, like they have out glass and plastic ones. I am already planing on making a few more up in other colors for other holidays!
Pattern can be found on Craftsy and in my Etsy Shop at an introductory price of just $6.00USD for the next week. Regular price is $8.00, that is 25%!
There is still time to make something for Christmas, don't put it off too long!

I came up with at least 6 different shapes, some didn't work out too well, others were to similar. Each pattern has gone through at least 2 revisions, some more than that!
This is a pattern I couldn't have created quickly without the use of CAD, no it wasn't a 3D model build, but it would have taken FOREVER to do with paper and pen.

There are 4 different ornaments, each has enough variations to distinguish it from the others.
Ornament C was actually the first pattern I developed, it is the most difficult of the lot do to the pattern piece doubling back on itself. It is the longest at 6 1/2" (16.5) long
Ornament A, at 5 1/2" (14cm) long, was then created, I essentially chopped off the center section of the pattern, this is the easiest of the 4 patterns, as it doesn't have as steep of curves. This is why it is listed first, instead of Ornament C
Ornament B followed quickly on the heels of A, but was a totally new draft. I was drawing inspiration from traditional glass ornament shapes. 4" (10cm) long.
Ornament D was created while the pattern went through its first round of testing. I decided I needed a sphere shape to round out the set. You saw this 3" (8cm) sphere in my last post.
This pattern is a good use for scraps as the largest pattern can be made from just three pieces, each measuring 4"x16" (10cmx40.5cm)
I have been able to make one up in an afternoon. I love knowing that my children will not be able to turn these ornaments in to dangerous shards, like they have out glass and plastic ones. I am already planing on making a few more up in other colors for other holidays!
Pattern can be found on Craftsy and in my Etsy Shop at an introductory price of just $6.00USD for the next week. Regular price is $8.00, that is 25%!
There is still time to make something for Christmas, don't put it off too long!
Subscribe to:
Posts (Atom)