
Originally post back in 2007
This was before I was making my patterns in CAD. This was not my first time taking a pattern off an old garment, I had done a Victorian bustle dress in a Friends collection earlier. This was however the first time I shared a pattern online. I have fond memories of taking the pattern off while my eldest child was in the highchair.
Or my Tribute to the late great Janet Arnold.
Women's Land Arm Corduroy Breeches
My mother bought these for me at a used Clothing store in Washington State, USA. I like odd clothing.
The Women's Land Army was a British war time task force mobilizing women to take over jobs that men used to do, mainly farm work, from what I can tell.
Lots more photos in detail!
The breeches were made by Redman Bros of Hebden Bridge
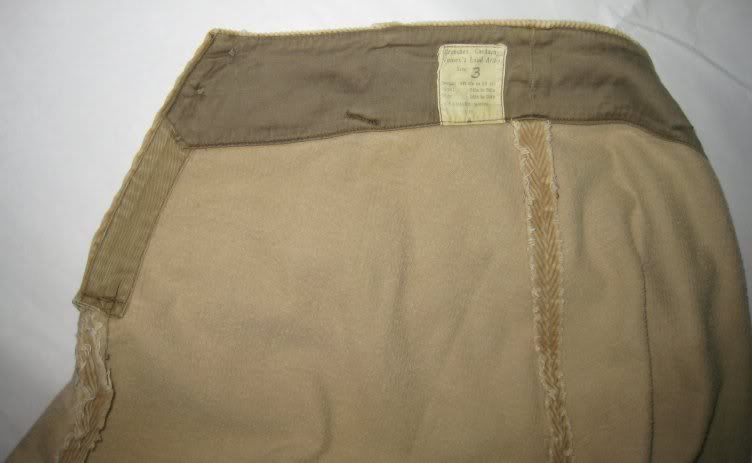
Picture of the Tag
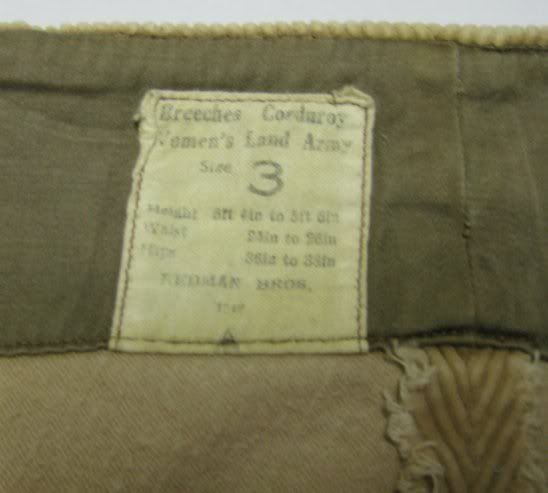
Breeches Corduroy
Women's Land Army
Size 3
Height 5ft 4in to 5ft 6in
Waist 24in to 26 in
Hips 36 in to 38 in
REDMAN BROS.
1942
There is a small black triangle at the bottom of the tag.
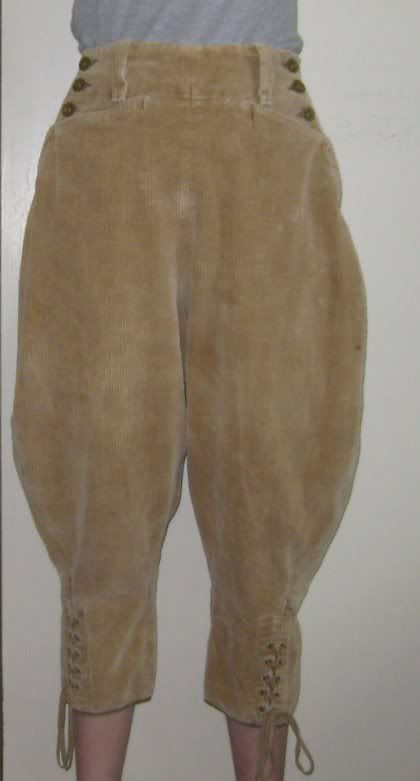
Photos of the breeches when worn
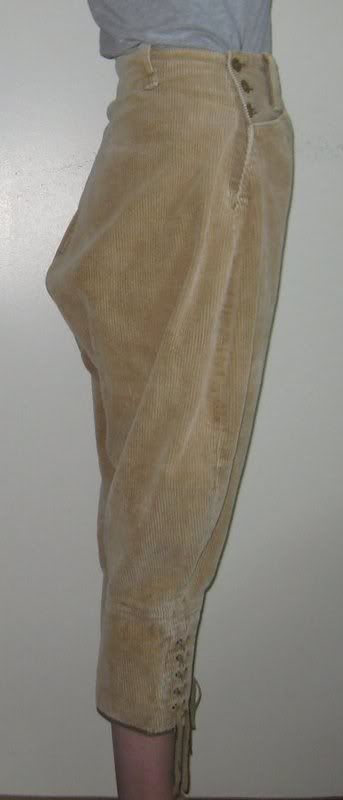
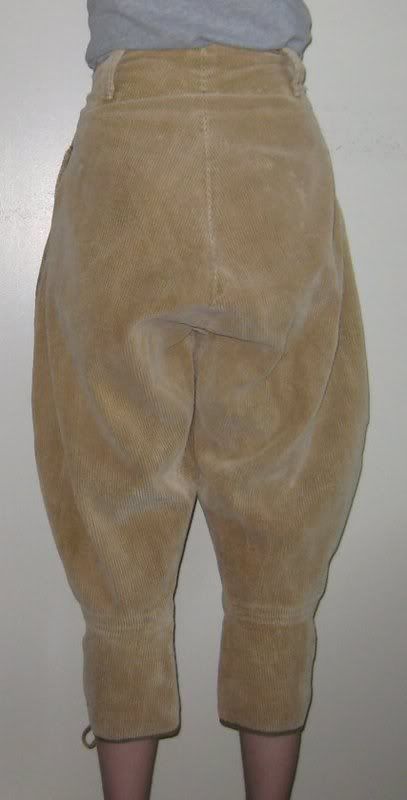
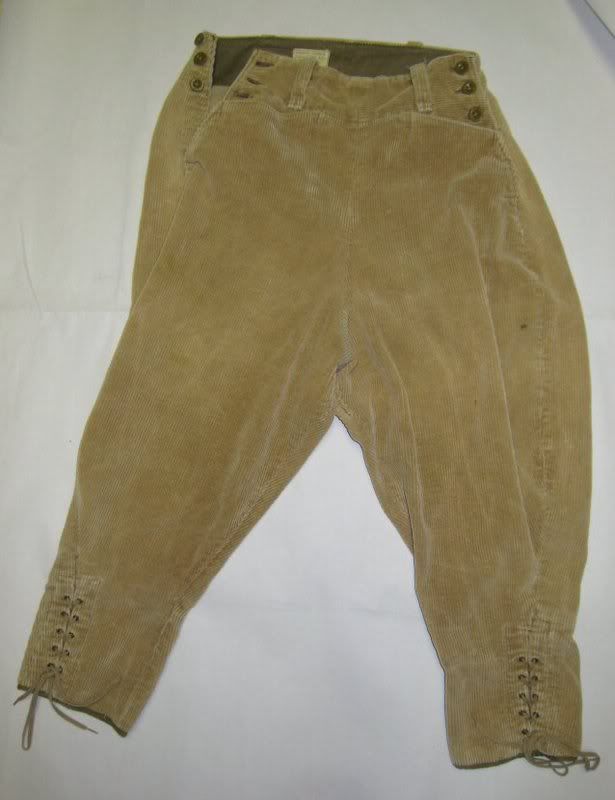
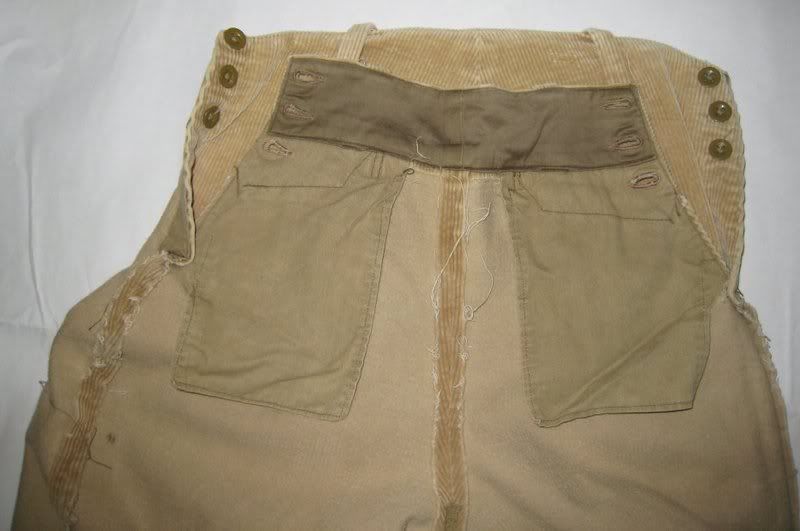
Photo of the breeches laid flat
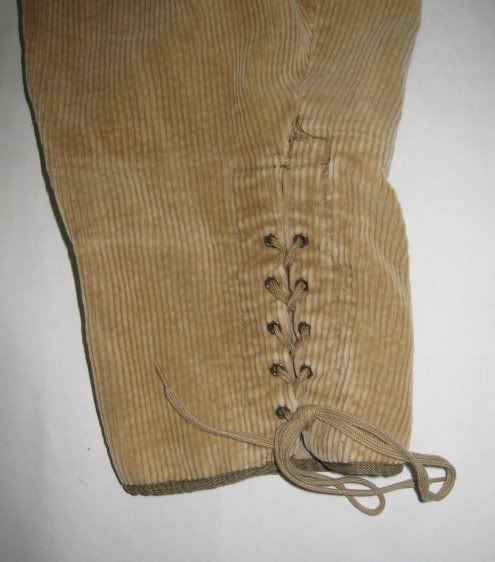
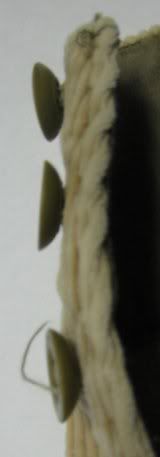
Lacing from outside

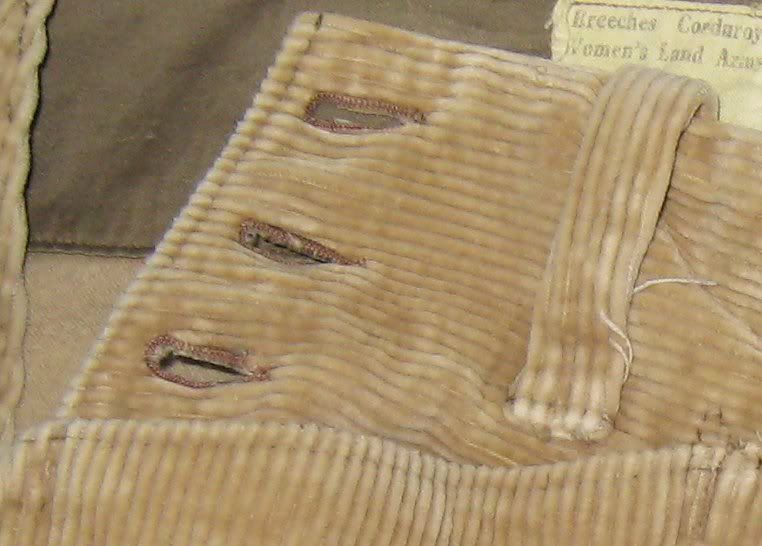
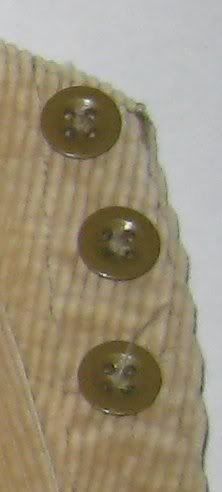
Buttons from the top
Tan cotton corduroy, pockets and facings are of slightly more green than tan cotton twill, the waist band facings are of army green cotton sateen.
There are 9 wales of cord per inch
Three 5/8 inch green four holed buttons on each side close the breeches.
The buttonholes are stitched in tan thread, there appears to be a green thread underneath the stitching (corded buttonholes?)
Two pockets in the front.
Four belt loops, two in front, and two in back.
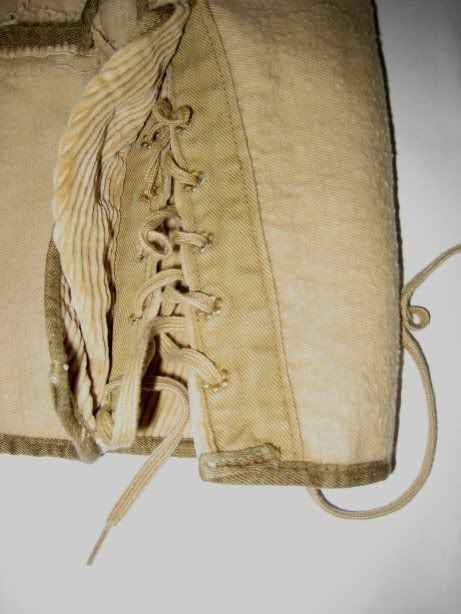
Lacing at Calf through 5 pairs of one-piece eyelets.
Eyelet opening is 3/16" Exterior rim is 5/16"
Eyelets start 1" up from the hem and are spaced 7/8" between centers
Lacing cord is tan cotton and between 40 and 46" long (I didn't unlace them) the ends are encased in plastic, just as with modern shoelaces.
Seam allowances are approximately 3/8 of an inch.
The corduroy has not had any seam treatment, and is lightly frayed, the twill and sateen have been turned under.
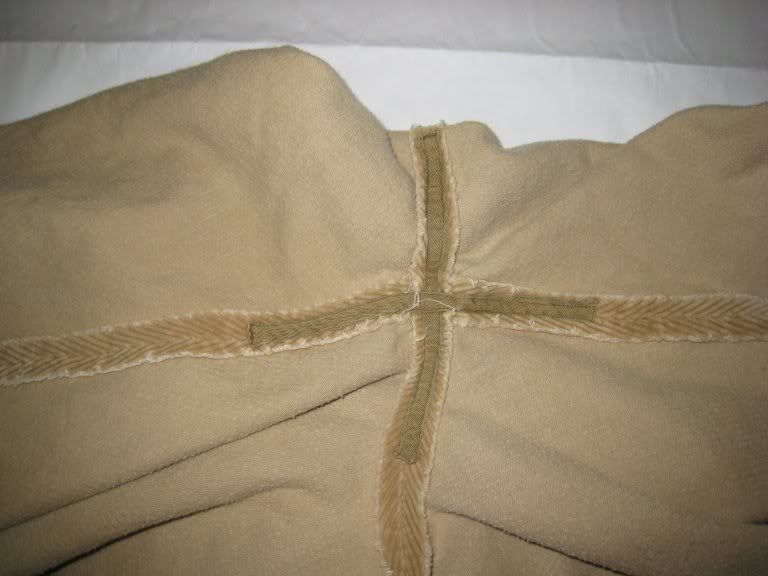
There is 1/2 inch wide green/tan twill tape on some of the seams in crotch seam (partially) and the back calf seam (completely).
The twill tape is also used as binding over the lacing protector flap and at the cuff of the breeches.
The ends of the twill tape are turned under before being stitched on. When used as binding, it is stitched in place in one step.
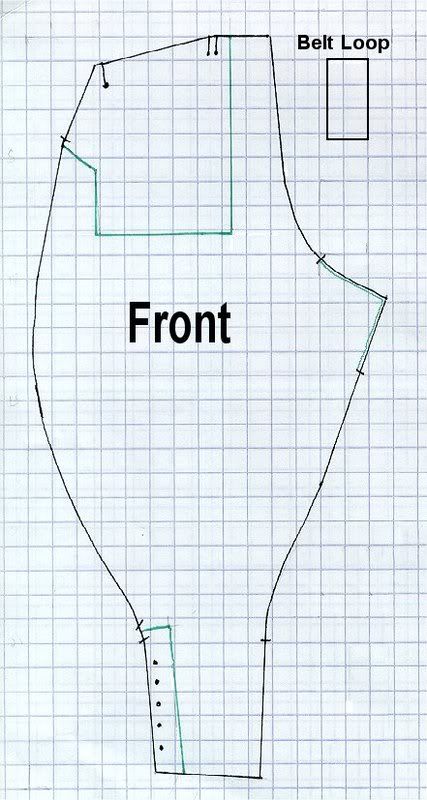
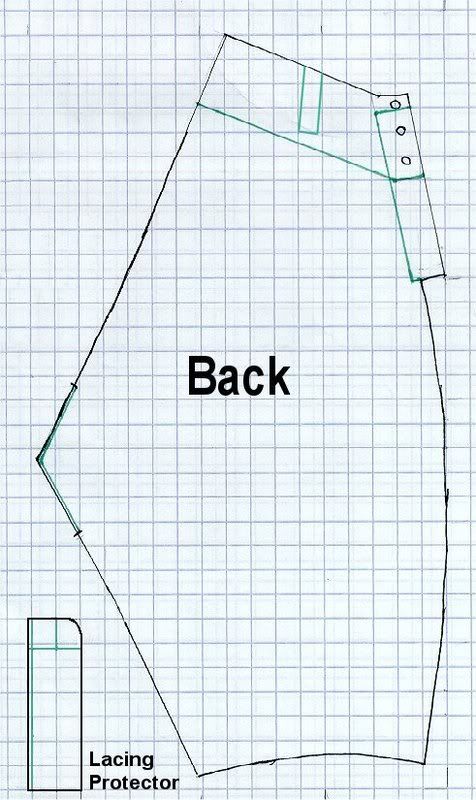
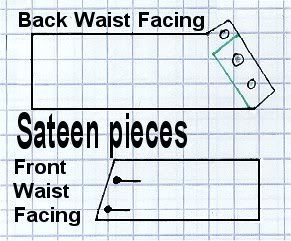
Pattern is drawn on Graph paper, one square equals 1"
All Teal colored lines are showing where additional pieces or stitching goes.
The Front
The Back
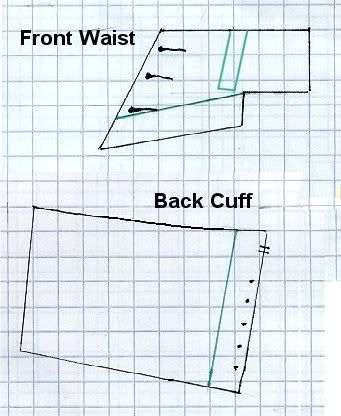
The Twill Pocket and facings

First enlarge the pattern to full scale. One square equals one inch.
Enlarge the full scale pattern if you need a larger size. (For this you might need to know something about grading patterns.)
Add seam allowance to every piece except the lacing protector flap, the sides of the belt loops, the bottom of the pocket facing on the waistband, and the cuff.
Cut out your pieces from your fabric
Yardage required as estimated from the patterns
2 1/4 yards of at least 36" wide Corduroy. (Might be possible to get everything out of 1 yard of 60" wide.)
1/2 yard of twill
1/4 yard of sateen
2 1/2 yards of ½” wide twill tape
Stitching order deduced from the breeches.
Sew the back cuff to the back leg. Press seams open and cover with twill tape.
Right Sides Together sew Pocket to the front of the breeches. Turn Right Sides Out and Top Stitch
Lay Waistband with Pocket Facing over the pocket and top stitch in place ½” from the cut edges of the pocket facing. Stop stitching 1” from the side seam
Stitch Front Waistband to Front Breeches.
Reinforce pocket by top stitching a small rectangle as shown near the belt loop.
Fold Pocket along fold line, press. Turn Seam Allowances inward and press. Stitch along outside edge, about 1/8” in from edge. Leave 1” open at upper inner edge towards Center Front.
Fold in Seam Allowance of pocket and breeches along side and top stitch shut.
Fold all seam allowances under on the back flap facings.
Turn under the side seam allowance on the back breeches.
Top stitch Facing in place.
Sew Side Seam of Breeches.
Stitch the overlap of the back facing in place.
Reinforce pocket opening by stitching as shown on pattern.
Fold all edges of Lacing Facings and press
Turn under Side Seam Allowances on breeches
Top stitch Facings in place.
Bind the top and side edge of the Lacing Protector with twill tape.
Stitch Lacing Protector in place along teal lines.
Sew legs together along inseam first and press open, then sew the legs together along the center front/center back seam, again pressing open seams.
Cut two pieces of twill tape, each 8” long. Turn under ends and center over the Center seam, then the inseam.
Fold up one end of the belt loops. Fold belt loops in thirds and stitch down center.
Sew waistband facings to get at center, press open. Fold under side seams
Sew tag to waist band.
Right Sides Together sew the waist band to breeches, catch the belt loops in between at the correct placement. Turn Right Sides Out, turn under raw edges and Top Stitch.
Fold belt loops down to correct paces and stitch in place.
Bind Hem in Twill Tape
Sew on Buttons
Sew Buttonholes
Insert Eyelets
Feel free to send this link out to anyone who may be interested, but please do not copy there pictures or the pattern!
Comments or Questions can be directed to me corsetra@gmail.com
I would LOVE to see anyone who has made this pattern up share pictures.
Here is Rebecca Shelly's recreation
There is a ton more research online about these breeches now than when I first posted the research.
Here is a lovely post by Crows Eye Prodcutions on recreating a pair of WLA breeches, it is nice to compare they two pairs together,
That is really nice! Thank you!
ReplyDeleteI came here through a Facebook link Isis posted. I'm new to your blog, but it looks very interesting and I'll definitely stay and look through the archives.
ReplyDeleteAs for this post: That's really awesome! Thank you for all your hard work on this one!
(copied and pasted my comment because I found this newer one)
ReplyDeleteis the pattern to the size of the pants? because if the waist is for 24 inches and the height is for 5' 6 inches just like the pants in the picture, this is perfect for me!
The pattern was taken off the garment in 2007 and is to the shape that the garment was in 2007 It may have stretched or shrunk since it was manufactured.
ReplyDeletePattern is drawn on Graph paper, one square equals 1"
I used to wear these at 5'4", 10-120# 26" waist, 36" hips.
How fab, thank you! Definitely making a pair for this autumn and will let you know how I get on.
ReplyDelete