Showing posts with label gifts. Show all posts

Thursday, December 26, 2013

Making Twilight into an Alicorn

For Christmas I got my children the 7” My Little Pony plush made by Ty. 

I knew they would want Twilight Sparkle to be an Alicorn (winged unicorn), so I made “Princess” wings for Twilight Sparkle out of polar fleece.

 I spent that last few days sewing these wings up, in plain sight of my children, telling them they were dragon wings (they almost believed me) and then attached them on Christmas Afternoon.

In case you too want to turn your Pony into a Pegasus, here is the pattern for the wings.
The pattern is for PERSONAL USE ONLY

Tuesday, December 24, 2013

Spunky Hedgie

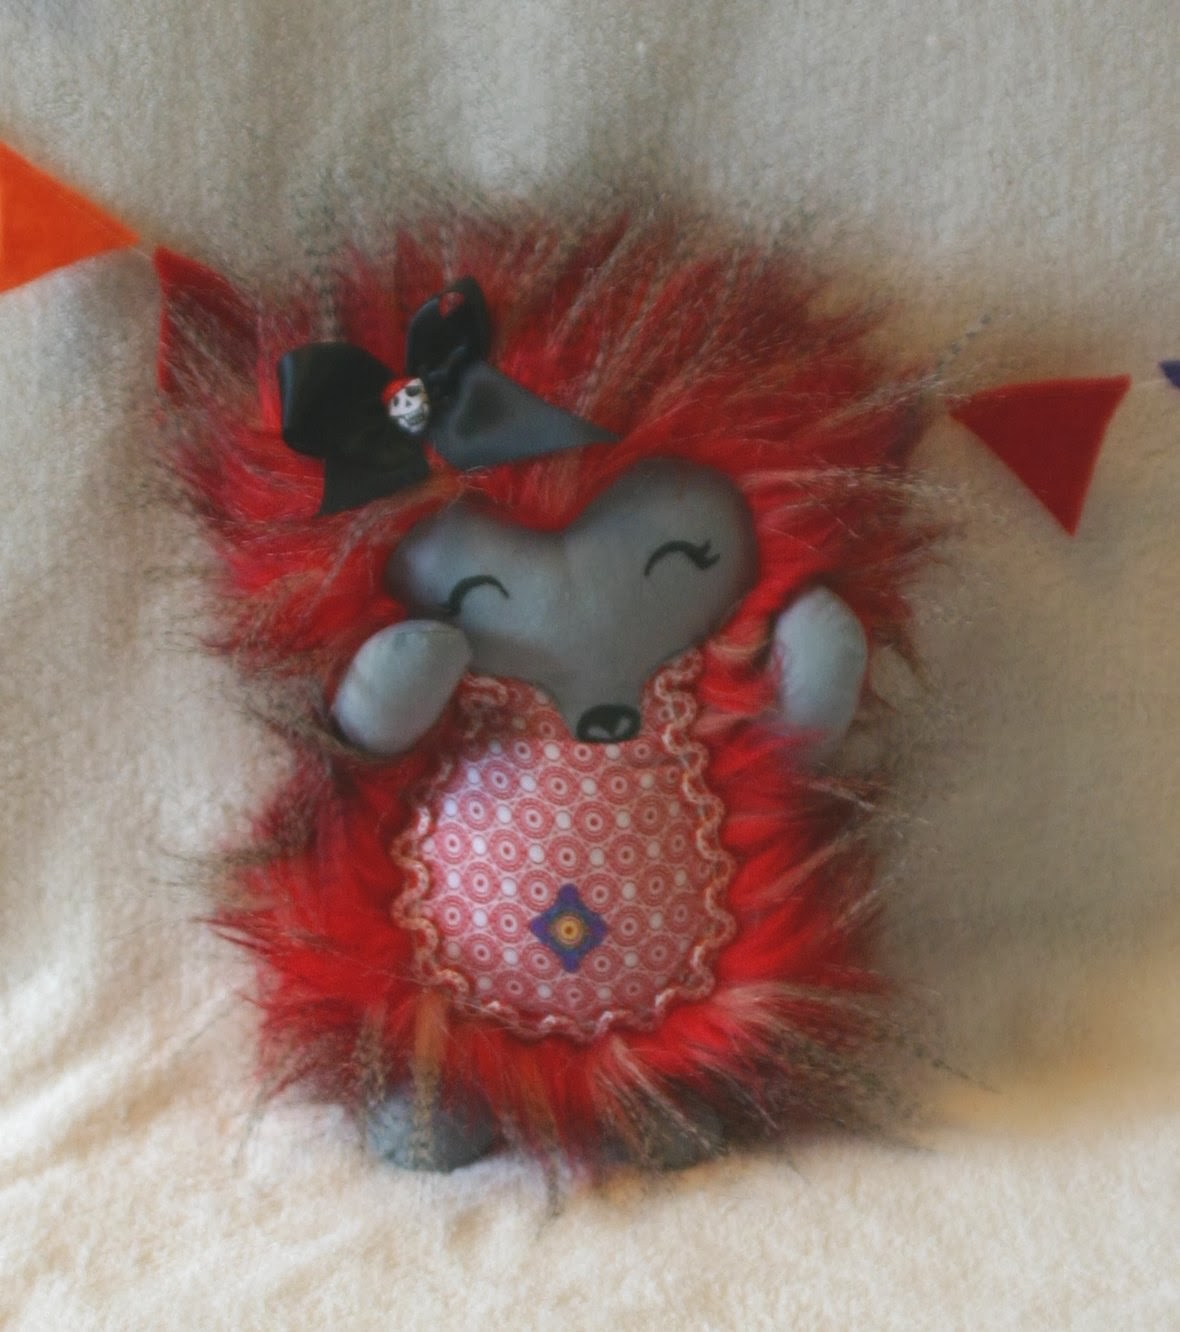
As part of my market reserach, I purchased Dolls & Daydreams' Hedgehog pattern to make up for a friend of mine.

While I had brown curly fabric like that shown on the pattern cover, I decided to see what my fabric store had. I ended up getting this fake furn in my friend's colors: Red, Black, & White.

I cut my pattern out with the fur direction going UP, in the hopes that this would give a more spiky look when finished.

Now this fur is long, especially for the size of the pattern, I didn't want extra fur in some places, so I cut off the fur 1/2" inside where the tummy and face would be. To do this I printed out a second pattern piece, cut out the sections that would be covered, drew around that on the back of the fur, then stitched using long stitches on the fur side, short on the back, and carefully found my stitches in the fur and cut off a boarder inside that stitch line.

I don't like using iron on bonding products, preferring to sew, so for the tummy and head, I traced the shapes onto my fabric, stitched on the lines, cut out, made a slash on the back THROUGH ONE LAYER ONLY. Then turned RSO, pressed and stitched down.

I added trim around the belly and decorated her belly with some fabric markers. Her face is also done with fabric markers. The scull on the bow is not a charm or button but a motif from a quilting cotton, It was small and fiddly but I knew it was just the right touch.

This was a gift for my dear friend, But she was sitting around my place for several months. I will however miss seeing this happy face around my house, but I can always make up another, I still have plenty of the fur (and no other idea what to do with it!)

Dolls and Daydreams pattern was clear and simple to follow, being a "flat" doll shape. There were clear step by step instructions. I did change things up a bit, besides the fabric choices (she recommends having the fur going DOWN, which is what you normally do with fake fur, but isn't very hedgehog-like.) I do however prefer to use the template method for small pattern pieces like the arms and legs, which is what I did.

Monday, December 2, 2013

Shapes around us inspire us.

Have you ever looked at an object and wondered how you could make it out of fabric?

I find myself doing this all the time. I have studied banana peels, my own hands, boat hulls, the list goes on.

It is winter here in the Pacific Northwest, which means the grocery stores are carrying Satsumas, Clementines and Mandarin Oranges. We like them as snacks, so easy to peel, portable, relatively seedless and sweet.

Of course we always try to get them unwrapped in one piece, it just makes the eating process more fun!

What do you get when you lay that orange peel flat? Why a Spiral of course!
And that is the inspiration for my newest pattern!


A set of 4 spiral shaped ornaments, here is just one of the shapes.
The pattern has been through one round of testing already and having received feedback, I have improved the pattern shapes and instructions as well as added a fourth shape. I will be calling for a second test on Wednesday. Would you like to sign up to be a pattern tester?

Monday, June 10, 2013

A gift for a book lover

Last week I was invited to an Acquaintance's Birthday Party, of course I decided to make something for her. I don't know her that well, but what I do know is that she sews and loves books. I took a quick look through my pinterest boards for crafty gift ideas and found some inspiration.

First idea was this project that I have been wanting to do for a while.
DSCN1770
Mini Bookshelf Quilt Tutorial by Don't' Call Me Betsy

Second the idea of a needle-book

Last was the idea that the finished gifts should LOOK like books when finished.

I ended up making TWO gifts, and my husband also contributed his skills to the gift, so it is from both of us!

The first gift is a Bag.

The second is a sewing supply case/needlebook

I wanted the bag to fold up into itself and when zipped close resemble a book. That last part is why I had to sit down and write an equation, which I already bloged about.

 Once I had all my math done, it was time to work on the book shelf design. I went through all my stash and cut off the useful selvages.

I want to warn you, if you ever intend to do a project using selvages, do not go to the fabric store with selvage on your mind. I needed a zipper, but found myself looking at fabric, JUST to see if it had a cute selvage name! I was good and didn't buy any fabric for the sole purpose of selvage.

I hand appliqued the entire design, using scraps and stash, in fact the only thing I bought for the bag, was the brown book cover and the zipper.

Appliqueing the books took the most time of the whole project, but I enjoy hand sewing and I wanted a nice finish, also those selvages are narrow...

 Some of the "Titles" are not what I would expect on the recipient's bookcase, but I didn't have many options.
The V&A one is my favorite, I decided that it HAD to be a big thick book.
Only one of the titles went back on it's fabric, and one other has an author from a different selvage

I must admit I went and looked at my bookshelves to double check the direction the titles should go. I am please to have a few that were narrow enough to go horizontally!

Once the applique was done I moved on to the "book case"
This was what the math was all about, two layers of coton with a layer of batting inbetween, since it was going to be stitched to the bag, I cut one side to turn it right side out.
Then I applied the zipper 1/4" in from the edges.
Here is what it looked like before I attached it to the bag.
 Then I made up the bag, and it would have been finished as is, except that I wanted it to go into the case.

 This what the book side looks like, before I added the title

 It folds up into the case quite nicely!
And then zips closed
Yes I admit my title is a bit lame, what can I say, I was tired at that point!

So that was the first gift, the second was also in a zippered book, slightly smaller, inside are sewing tools.


My husband turned this seam ripper, it is so nice to hold, we hope she likes it.
 I love that the there is no cap to lose, you just pull it out and flip it around, and rip away!
I purchased scissors, needles, and safety pin, as well as the supplies to make the seam ripper for this part of the project.
 The print you see there is dictionary terms for sewing words and is actually a small zipper pouch, could be used to hold thread, buttons, etc...

 There are 2 pages of wool felt for needle and pin storage.
 Last "page" is stitched into the book, covering the slit where it was turned, again wool felt, this time I embroidered "Needles" on ti it.

So that was my weekend craft project, unfortunately I was working on it until the party was to start, and transit time would have made it prohibitive to go for such a short visit, not to mention my children needing a regular dinner and bedtime.

Tuesday, December 18, 2012

Giftmas 2012 Part 1

I tend to keep my religious and political views out of my costuming, but the winter holidays are mixed with religion, seeing how I exchange gifts with folk who celebrate various holidays in various ways, I have latched onto the term GIFTMAS to cover the gifts exchanged during the winter holidays.

This year, since I moved, I found myself NOT sewing costumes for winter events. Normally this would be clothing for the growing children.

Instead I put my sewing efforts toward gifts.

Since I good reception of the embroidered hankies from my husband. I decided to do that again, so I purchased a new set of 6, half had grey borders, the other half were blue.

I decided to go with a Geek theme for these and ended up pulling from various interests.

First one up was the Spitfire, the image was pulled off a set of WWII spotter playing cards that we have. (Reproductions)
 Next up was the Tardis, which was the most intensive one that I did!
 Then came the Star Trek insignia.
 Last was a companion cube. this companion cube is just 1" square and I didn't put it at a diagonal like the others.

Presentation is everything, so I wove them together into a pretty little square.

Even the backside is woven.

Finally a rule for scale.

I decided that I would also embroider one for a family member who has the nickname of Rabbit. the image came from The Ultimate Design Source Book for Crafters, found in the Fairies and Angels section.

I am so pleased with how the little face turned out.

Just for good measure the back of the rabbit.
Lastly I would like to apologize for the photos, I am not good at photography and had to sneak these photos when my husband wasn't looking.
If you talk to any of may family, please do not give these gifts away!

Tuesday, September 25, 2012

A Handmade Gift

When money is tight but the stash is large.
When a Special even is coming and requires a special something.

My husband had a birthday recently and I was at a loss on what to give him. He is a low key kind of guy so he wouldn't have been bummed if I didn't give him anything, but I couldn't do that. I knew of several things that he wants, and several that he needs, but they were all more than I was wanting to spend. A conversation between friends online lead me down the path of how old fashioned he is and I had the brilliant idea of embroidering one of the cloth handkerchiefs that he uses. It would require no money just a design and some time!

I decided I wanted to use an actual Victorian pattern and headed over to De Gracieuse to search through the embroidery patterns. I didn't find Letters of his initials that I liked, many were too flowery, and honestly I am not fond of the way his initials look together. then I found it!

October 1st, 1867, Issue 20
(if the link doesn't work, search for "Gracieuse. Geïllustreerde Aglaja, 1867, aflevering 20, pagina 172/3"
My husband's nickname is Cat, so I left off the O in Cato. I cropped the image and printed it out at the size my printer wanted to and copied it onto the hanky.
 I managed to embroider it, in the same room as my husband (since he was home all this time) and he didn't notice! I was done with it quickly enough that I decided to do a second one. This one I had fun with making my own design.
I think he liked the second one better, but he did appear to like both and was surprised that I had made them right under his nose!

I am not very good at embroidery so I can't tell you much about the stitches other than I used satin and split stitches (I think, I could be very wrong.) I also did not knot the end of the threads, but wove them under the back of the embroidery. I thought this would give a better look to the backsides.

For the sake of honesty, here are the backsides. and I apologize for the poor lighting, I had to be sneaky in the early morning on his birthday to get these pics.